
The first stand-alone reverb unit from Fender was (a prototype) the 6GRV, produced in early 1961. Very quickly the model number changed to 6G15. As a result, the 6GRV is almost unknown and extremely difficult to find. I have never seen one, but at least a few exist. There was no difference between the schematics of the 6GRV and the 6G15.
Other manufacturers already had spring reverb, so Fender was a little late to the game. It was (and is) a good business strategy – “Want to buy a new amp with reverb? Why not just buy an add-on reverb for your existing Fender amp?”. (Fender would not offer an amplifier that incorporated reverb until a few years later, with the introduction of the Vibroverb).
The Fender stand-alone reverb unit is big; it is as wide as a tweed Deluxe. It was designed to sit on top of a (Fender) amp, there was even a little cut-out on the base to make room for the handle of the amp it was sitting on.
Fender’s reverb unit featured three controls: Dwell, Mixer and Tone – this gives the unit much more control over the effect. Later Fender amps with reverb had only a single “Reverb” control. The 6GRV includes a 12AT7 tube as a preamplifier; a 6K6 tube as the reverb driver; and a 7025 as the reverb recovery tube. The rectifier is a tin diode solid state unit. The first units provided only half-wave rectified power. The nature of reverb is that it does not require high-quality music reproduction – the signal was going through metal springs, after all, and would lose all of its bass and a lot of the definition, compared to a high-fidelity speaker.
The Reverb Unit was a hit – it may have even inspired a whole new genre of popular music called “Surf Music”. To this day, Surf aficionados insist that the Fender Reverb is the best sounding, most versatile, and controllable reverb out there.
Also in 1961 Fender came out with the new Deluxe amplifier (with tremolo!). It was covered in rough brown Tolex, had a brown face plate with white lettering, and wheat-colored grill cloth. The 1961 reverb unit matched this design exactly. The 6GRV was clearly made to sit on top of the 1961 Deluxe and add reverb to the already-equipped tremolo.
Production of the outboard reverb unit continued, with continuous changes and improvements, until 1966, when there were multiple Fender amps with built-in reverb. Fender’s position changed to, ” Want to buy a new amp with reverb? Buy a Fender!”. There were reissues of this famous unit in the late 1970s and again in the 2000s. (The original 6G15 reverb was replaced by the solid-state FR-1000 in 1967, but the less said about that the better)
I found a Gibbs reverb tank from an original early Fender reverb unit and decided to restore/reconstruct the rest of the unit around it. Here’s how it went:
The first model, the 6GRV, is very rare, and unknown even among aficionados, having been produced just months before becoming the 6G15. The Fender reverb unit was hand-wired and employed many of the components that were found in Fender guitar amplifiers at the time. The circuit employed a power transformer, a choke, and an output transformer. The choke and output transformers were small and may have been the same model number.
I found a great, accurate cabinet online, and a reproduction chassis was not too hard to find. I could not find authentic reproduction eyelet boards for the circuit, the rectifier, and the filter caps anywhere. Doug over at Hoffman Amps was kind enough to custom design and make the eyelet boards, which matched the boards from 1961.

I made the reproduction capacitors, which, as originally, were a mix of Astron Minimites, blue tubular film capacitors (Mallory) and yellow Astrons. In 1961 Fender was transitioning from the yellow Astrons to the blue “Paktrons”. The 1961 Deluxe amp also shows this mix of capacitors.
Nobody makes the brass grounding plate for this unit, nor do they reproduce the filter cap cover. I made the brass plate from cartridge brass stock and modified a small filter cover to fit. The circuit and layout of the 6GRV is rather straightforward and simple. I used the correct cloth push-back wire with the correct colors, and tin diodes, which I stole from a junked 1960s Bandmaster.

The transformers were all new, and came from Classic Tone, a company I used almost exclusively until they closed their doors a couple of years ago; they use paper-wound cores and replicate the specifications of the original Fender transformers. The boards were assembled and soldered in less than an hour. In order to solder the ground leads to the brass plate, and the transformer grounds to the chassis, you absolutely must have a high-mass, high-powered soldering iron, like Big Bertha (below).

The reverb unit is the only time that Fender put the power transformer inside the chassis with the circuit boards. I guess they weren’t worried about induced noise, since the transformer was so far away from the circuit board.

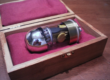
The reverb tank was mounted vertically to the back of the cabinet, along with the damper bar. The mounting posts and springs to suspend the tank are impossible to find – but you must match the spring size and spring rate of these, or you may affect the tone and performance of the reverb unit. I researched for months before I found a source for the posts and the correct springs.

Here is some interesting reverb tank information from wiki.surfguitar101.com:

Adjunct to the discussion below regarding swap of the pan, orientation of the pan (hanging vertically vs. horizontally in the floor of a combo amp) can influence tonality beyond the convenience aspect of connecting it with the RCA-plugged cables and should be the prime decision-maker in the PN ordered (slightly longer RCA cables can easily be obtained).
It’s been pointed out that the difference between the vertical and horizontal reverb tanks has to do with the “ideal mounting plane” for the tank inside the cabinet. The ideal plane is one that allows the transducer magnet to be centered in the “air gap” between the magnet and the transducer. Tanks made for vertical mount are “the best positioned mechanically to maintain that air gap”. Tanks made for horizontal mount have some mechanical compensation added to the magnets’ position. That is, the magnets in horizontal tanks have been “factory adjusted” to be centered in the air gap for the horizontal mounting plane. This “factory adjustment” is considered less desirable from an electro- mechanical perspective. Some would argue that horizontal tanks are not as “musical” as well, although one would be hard put to fault an older Hammond tank in a Twin Reverb operating up to par.
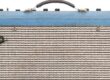
Almost complete (above). Fender used blue wire for the filaments; I have no idea why, as all other Fender amps in history use green wire for the filaments. Maybe they had an over-abundance of blue wire, for some reason.

The chassis was installed into the cabinet. If you look closely in the upper right of the chassis, you might be able to see the red “domino” capacitor on the tone control, exactly the same as the tweed Deluxe. This would be the last time that Fender would use domino caps in the circuit of an amplifier.
The chassis is marked with the date (01/17) and the classic HardWay logo.

I used all NOS RCA tubes for this build, including a real 7025 and a 6K6GT driver. The unit started up right off the bat and sounded glorious. Some of the reverb characteristics may be due to the use of a 65-year-old reverb tank. The springs have aged and have almost certainly lost tension and stress over the years. This reverb can be dialed in to be as swampy and/or lush as you want it to be.
(Below) the original prototype 6GRV probably had brown knobs; I used white knobs here. Because I like white knobs. I used blonde Tolex, Oxblood grill cloth, and the flat Fender logo. Because it looks nice. Also, the early units included a 2-prong “courtesy outlet” that you could plug something else into. These components are extremely hard to find, and expensive, if you do happen to find one. I found one. For safety reasons, the power cord on this unit is a three-conductor, with safety ground.


Want to build one yourself? It is a pretty simple parts list:

…and the layout:

…and the schematic: